

Of all the jobs on a wedding to-do list, the seating chart is the one couples dread most. It looks simple from the outside, a few tables, a few names, and yet it is the task people put off until the very last week. The reason is not the tables. It is everything tangled up in them. Your favourite aunt cannot sit near the uncle she no longer speaks to. Your university friends want to be together. One side of the family is quietly counting how many seats they were given. And every time someone changes their reply, the whole puzzle shifts again.
Then there is the version most of us grew up with, a big sheet of paper, sticky notes with names on them, and a small pile of names that fall off and get lost under the sofa. You move one person and three others no longer fit. This guide is about doing the same job calmly, in one place, with the names coming straight from the guest list you already built. It walks the whole thing end to end, and it is honest about the parts that stay a little messy no matter what, because a few of your yeses will always turn into empty chairs.
The short version
- Seating in Laylaty is an internal tool, just for you and your co-hosts. Your guests never see it.
- Build your tables first, give each one a name and, if you like, a number of seats.
- Your guests appear on their own, pulled straight from your real guest list and invitations, so there is nothing to retype.
- Seat a whole family in one move, or open a group up and place people one by one across different tables.
- Tap a guest, then tap a table. On a computer you can also drag them across. Moving someone later takes a second.
- It does not hide people who declined, so you stay in control of who goes where, and you can adjust the moment plans change.
First, a few plain words
Before the steps, three small terms, so nothing later feels like jargon.
A table is exactly what it sounds like, one of the tables at your reception. In Laylaty you create each one, give it a name like Rose or Family or Table 1, and you can add how many seats it has if you want a gentle nudge when it gets full.
An assignment is simply the act of placing a guest at a table. When you seat someone, you are assigning them. Move them somewhere else and the old spot clears on its own, so nobody is ever accidentally sitting in two places at once.
An internal tool means it lives on your side of Laylaty and only your side. The seating plan is for you and anyone helping you host. It is never shown to guests, it is not part of their invitation, and it is not on your event website. Think of it as the planning sheet on your desk, not something you hand out.
Before you start: build your guest list
Seating is the step that comes after your guests are in Laylaty, because it draws its names directly from there. If you have already added your guests and sent invitations, you are ready. If not, add your people to the guest list first, and, ideally, collect a few replies so you have a sense of who is coming. There is a whole separate guide to that part, on collecting RSVPs online.
The nice thing about this order is that you never type a single name into the seating plan. Everyone you added shows up on their own, ready to be placed.
Step 1: open the seating plan
Open your event and find Seating among your planning tools. The first time you arrive it is a clean, two-part screen. On one side, an empty space waiting for tables. On the other, a quiet prompt to create your first one. This is the desktop tool, and it is worth opening on a laptop or a larger screen, because you will want the room to see the whole layout at once.
Step 2: build your tables
Add your first table and give it a name. A name is friendlier than a number when you are staring at the plan for the tenth time, so Grandparents or Uni Friends often works better than Table 4, though plain numbers are fine too. If you know how many seats a table holds, add that as well. It is optional. Leave it blank and the table simply has no limit.

Adding the seat count buys you a small, useful safety net. As you seat people, each table shows how many are seated against how many it holds, and if you go over, it flags the table so you notice before the caterer does. It will still let you do it, because sometimes you genuinely want ten around a table built for eight. It just makes sure the choice is yours and not a surprise.
Tip
Build a few more tables than you think you need and leave one a little empty. That spare room is where the last-minute yes, the plus-one you did not expect, and the two cousins who must not sit together all end up going.
Step 3: seat your guests
This is the heart of it. On one side of the screen is everyone who is not seated yet, drawn straight from your guest list. On the other side are the tables you just built.
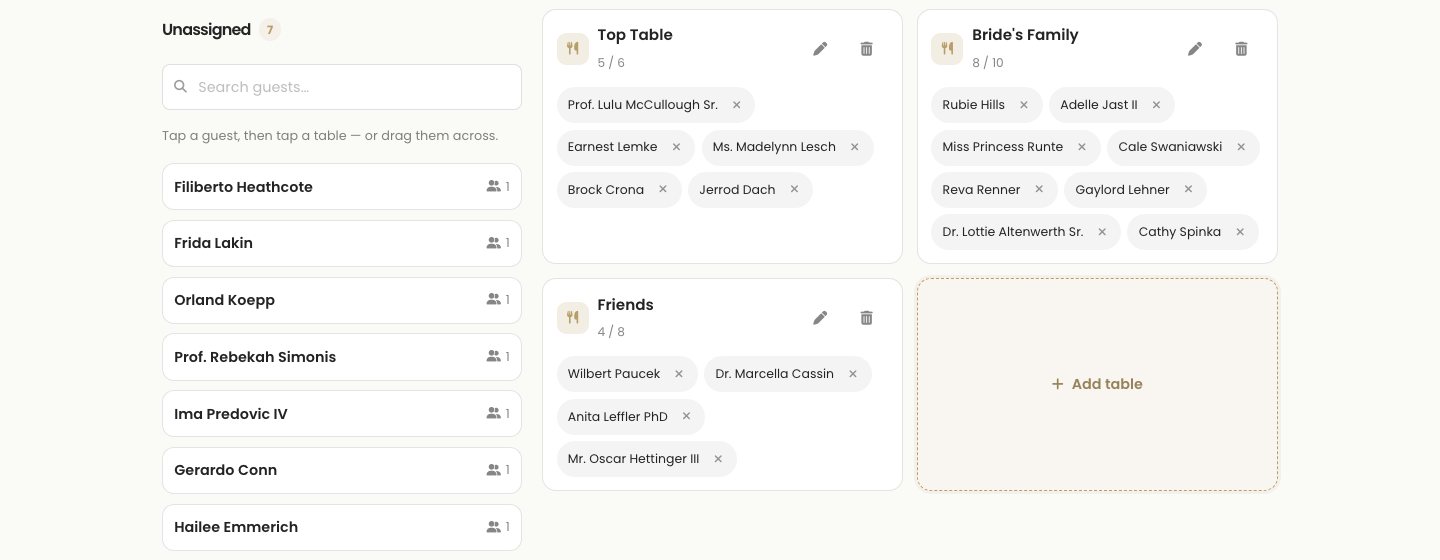
Notice how your guests are grouped. If you invited a family on one invitation, they arrive as one little party, the lead name with the rest tucked underneath. Any plus-ones people are bringing show up here too, by name where you have it, or simply as Plus One where you do not. A search box helps you find a name quickly once the list gets long.
To seat people, you have two easy ways, and they do the same thing.
The first is tap to place. Tap a guest or a whole family to pick them up, and a small bar appears to remind you what you are holding. Then tap the table where they belong, and they settle in. Tap the same guest again, or press Escape, if you change your mind before you place them.
The second way, on a computer, is to drag a guest across and drop them onto a table. Use whichever feels natural. Neither one asks you to open a menu or fill in a form.
You do not have to keep families together, either. Open a party up and you can place each person on a different table, so the parents sit with old friends while the teenagers claim a table of their own. When everyone in a group ends up spread across the room, the plan quietly tells you so, which is a gentle reminder in case it was not what you meant.
Step 4: keep it tied to who is actually coming
Here is the honest part, and it is worth understanding clearly.
The seating plan always shows your whole guest list. It does not quietly remove the people who declined, and it does not automatically seat the people who said yes. That is on purpose. You are the one who decides who gets a chair, and plans around a wedding are rarely tidy enough to trust a machine to sort them for you.
In practice, that means you seat the people you know are coming, and you leave the maybes and the declines unplaced for now. Because everyone stays visible, nobody ever falls off the list by accident, and if a decline suddenly changes their mind, they are right there waiting to be seated. The plan keeps a running count of how many guests you have seated so far, so you always know how much of the puzzle is done.

Now the part every couple learns eventually. A good rule of thumb that planners repeat is that something like a third of the people you invite will not be in the room on the day, once you add up the polite declines and the genuine last-minute no-shows. And even among the guests who happily tapped yes, a few still will not make it, a sick child, a delayed flight, a change of heart. This is completely normal, and it is not a reflection on you or your wedding.
The reason it matters here is that a seating plan built to the exact number is a fragile thing. Leave yourself a little slack. It is far kinder to your future self to have a table with a spare seat than to spend the morning of your wedding redrawing the whole room because two people cancelled.
Step 5: adjust as the day gets closer
Weddings move right up to the last minute, and the seating plan is built for that. Because seating someone is just a tap, moving them is just as quick. Pick a guest up from one table and drop them at another, and the first table clears itself. Remove someone with a single tap and they go back to the unplaced list, ready to reseat if they turn out to be coming after all.
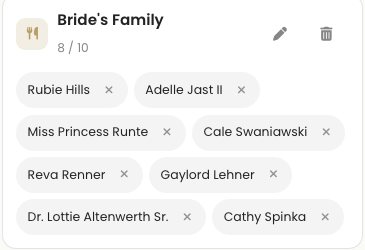
When a table needs to go entirely, you can delete it. The people who were sitting there are not lost, they simply return to the unplaced list so you can seat them somewhere else. Nothing you do here is permanent or fragile, which is the whole point. The plan is meant to be reshaped as often as your guest list changes.
Make it your own
Most of the plan bends to how you actually think about the day. A few dials worth knowing:
- Table names. Call them anything, from Table 1 to Bride's Family to the name of the flower on the centrepiece. Names make the plan much easier to read at a glance.
- Seat counts. Add them where you want a nudge when a table fills up, or leave them off for a relaxed layout where you are eyeballing it anyway.
- Whole families or individuals. Seat a party together in one move, or open it up and scatter people exactly where they belong.
- How much room to leave. Build in a spare seat or a spare table for the changes you know are coming.
Frequently asked questions
Can my guests see where they are sitting?
No. The seating plan is internal, for you and your co-hosts only. It is not part of the invitation, it is not on your event website, and guests have no way to view it. On the day, you or your venue decide how to show people to their seats, with place cards or a printed board at the entrance, in whatever style suits your wedding.
Does it automatically seat the people who said yes?
No, and that is deliberate. It shows your whole guest list and lets you decide who to place. It will not hide the people who declined either, so you always have the full picture and stay in control.
What happens when someone changes their reply, or does not turn up?
Nothing breaks. Because everyone stays on the list, you just seat a new yes when they appear, or move people around when plans shift. For the no-shows that always happen, the best plan is simply to leave a little breathing room rather than filling every seat to the exact number.
Can I put more people at a table than it holds?
Yes. The seat count is a guide, not a lock. If you seat more people than a table holds, Laylaty flags it so you notice, then lets you go ahead. Sometimes squeezing in one more is exactly what you want.
Do plus-ones show up in the plan?
Yes. Every plus-one attached to an invitation appears as its own person to seat, by name where you have collected it, or as Plus One where you have not. That way a family of four takes up four seats in the plan, not one.
Is this the same as a wedding website or an invitation?
No. Seating is a private planning tool inside your event. Your invitations and your event website are separate, guest-facing things. The seating plan never leaves your side of Laylaty.
Your tables, your call
The seating chart earns its scary reputation, but most of the stress comes from doing it on paper, at the last minute, with names that will not stay put. Done calmly, with your real guest list already in front of you and a plan you can reshape in seconds, it turns back into what it should be, one of the last happy details before the day itself.
Open your event, build your first few tables, and start placing the people you love around them.